Karam Tools
Choosing the right laser level can improve alignment, speed, and confidence on a construction site. The 2026 market includes red-beam line levels, green-beam models, dot lasers, cross-line tools, and rotary lasers. Each type serves a different working distance and accuracy requirement. A cross-line laser can mark wall outlets clearly, while a rotary laser suits large foundations and exterior grading. Green beams often appear brighter indoors, but they may consume batteries faster.
Learning how to safely use a laser level on a construction site begins before switching it on. Laser-safety specialist Dr. David H. Sliney stated, “Never look directly into a laser beam.” That principle remains simple and important. Check the product label, laser class, battery condition, and calibration record. Wear suitable eye protection when the manufacturer or site assessment requires it. Never aim the beam toward workers, vehicle operators, or nearby public areas. Keep the unit on a stable tripod, away from vibration and moving equipment.
Small details matter. Place warning signs near doorways and shared work zones. Protect the instrument from rain, dust, and accidental impacts. Confirm the reference point twice before marking concrete or steel. A receiver can help outdoors, where sunlight weakens visibility. Do not assume self-leveling means error-free. It does not. A damaged tripod, uneven surface, or missed calibration check can shift every measurement. This guide compares the leading 2026 laser level types, explains practical setup methods, and examines safer habits for real site conditions. Some steps may feel slow. They are still cheaper than correcting a misaligned wall.
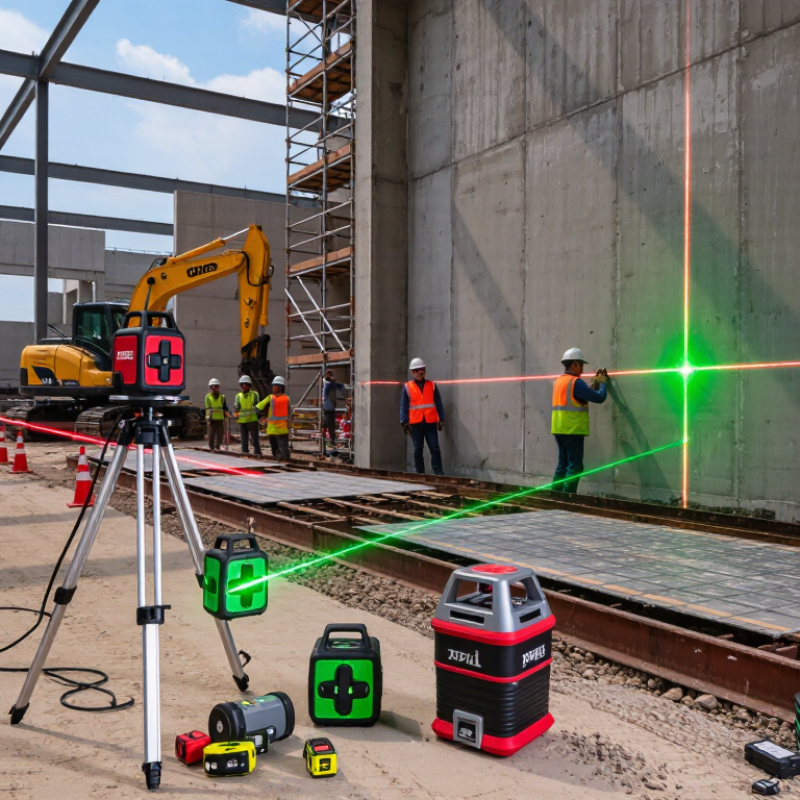
Laser level types now serve different site needs. Dot lasers mark transfer points across floors, walls, and ceilings. Line lasers project horizontal or vertical references for cabinets, partitions, and tilework. Cross-line models show both axes at once. Rotary lasers cover larger sites, including foundations, grading, and exterior framing. Multi-plane lasers create several 360-degree lines, helping crews check rooms without moving the tool.
Green beams often appear clearer in bright interiors. Red beams usually consume less power. According to a 2024 Grand View Research outlook, the global laser measuring tools market is expanding steadily, supported by construction digitization and renovation demand. That growth does not make every laser level suitable for every job. A rotary model can be excessive for a small bathroom. I have also seen inaccurate results caused by a slightly loose tripod, not a faulty instrument.
Tips: Check calibration before critical layout work. Keep the beam below eye level. Never stare into the aperture. The U.S. OSHA Technical Manual identifies low-power visible lasers as a potential eye hazard, even when exposure seems brief. Follow IEC 60825-1 labeling and workplace procedures. Secure the tripod on solid ground. Mark reference points with a pencil, then verify them manually. Dust, vibration, and reflective surfaces can distort readings. Recheck after moving the tool. Small errors become expensive walls.
A correct setup begins with a stable tripod, not the laser itself. Place it on firm ground, away from vibrating equipment and direct sunlight. Check the housing, lens, battery, and pendulum lock before switching on the unit. OSHA 29 CFR 1926.54 requires only qualified employees to install, adjust, and operate laser equipment. Keep the beam below eye level whenever possible, and block access across active work zones.
Allow the laser to self-level fully. Do not trust the first visible line. Mark a benchmark on a nearby wall, rotate the unit 180 degrees, and compare both readings. A noticeable shift indicates setup movement or calibration error. For longer runs, repeat the test at several distances. Temperature changes, rough transport, and tripod settlement can affect accuracy. A useful field habit is recording the date, site temperature, and test result in a simple log.
The U.S. Bureau of Labor Statistics reported 1,075 fatal occupational injuries in construction during 2023. Precise alignment cannot remove every site hazard, but it can reduce rework, rushed corrections, and unnecessary exposure near moving crews. Never stare into the beam or aim it toward traffic, operators, or reflective surfaces. Even experienced workers miss a loose tripod clamp. That small oversight deserves a second check. Calibration should follow the equipment’s stated tolerance and a qualified laboratory schedule, especially after a drop or failed verification test.
Dot, cross-line, multi-line, and rotary laser levels are commonly used for layout, alignment, elevation, and grading work. Always check the laser safety class printed on the instrument before use.
Reference values show maximum accessible emission limits for visible continuous-wave laser classes under IEC 60825-1. Actual classification depends on wavelength, output, and operating conditions.
Step-by-Step Instructions for Using a Laser Level on Site
Choose the correct laser level for the task. Line models suit walls and cabinets, while rotating models support longer layouts. Check the housing, lens, battery, and calibration sticker before work. Place the tool on a stable tripod or firm surface. Keep it away from vibrating equipment and moving traffic.
Power it on, allow self-leveling to finish, and confirm the indicator shows a level status. Mark one reference point, then transfer the line or point carefully. On bright sites, use a compatible receiver instead of staring at the beam. Never aim the beam toward workers, drivers, aircraft, or reflective surfaces. Read the warning label and follow IEC 60825-1 guidance for laser classification. OSHA 1926.54 also requires construction laser equipment to meet applicable safety controls.
Wear eye protection when the risk assessment requires it, especially near reflective materials. The U.S. Bureau of Labor Statistics recorded 1,075 fatal construction work injuries in 2023, showing why small shortcuts deserve attention. Keep the work area controlled and label the active beam path. I still recheck the reference point after moving the tripod. That extra minute can expose a bad setup. Power down before packing, protect the lens, and record any impact or suspected calibration error. Do not trust a perfect-looking line blindly.
Step-by-Step Instructions for Using a Laser Level on Site
| Laser Level Type | Main Projection | Typical Site Applications | Typical Working Range* | Key Safety Considerations |
|---|---|---|---|---|
| Point Laser Level | One or more reference points | Transferring points, setting out electrical or plumbing locations, and checking alignment | Approximately 10–30 m indoors | Keep the beam away from eye level and never use the point as a visual aiming target. |
| Line Laser Level | One or more horizontal, vertical, or cross lines | Installing cabinets, partitions, tile, doors, windows, and suspended ceilings | Approximately 10–30 m indoors; more with a detector | Control access around the projected line and avoid directing it toward workers, drivers, or reflective surfaces. |
| Rotary Laser Level | A rotating horizontal or vertical reference plane | Grading, foundations, concrete work, large-area leveling, and exterior layout | Approximately 100–500 m diameter with a compatible detector | Use a detector outdoors, mark the controlled work zone, and keep the instrument stable against vibration or impact. |
| Cross-Line Laser Level | Intersecting horizontal and vertical lines | Wall tiling, framing, partition installation, and setting vertical and horizontal references | Approximately 10–30 m indoors | Use the lowest practical beam height and prevent unplanned exposure in occupied areas. |
| Plumb Laser Level | Vertical reference points or a plumb line | Transferring points between floors, column alignment, and checking vertical installation | Approximately 10–30 m indoors | Do not look into the aperture or place the beam where it can enter a worker’s eyes from below or above. |
| Green-Beam Laser Level | Visible green horizontal, vertical, or cross lines | Bright indoor areas and tasks where line visibility is important | Often similar to red-beam units; actual range depends on light and specifications | Greater visibility does not mean greater safety; treat the beam as hazardous to direct eye exposure. |
| Self-Leveling Laser Level | Automatically corrected level or plumb references within a specified range | General interior layout, fit-out, framing, and installation work | Common compensation range: approximately ±3° to ±5° | Wait for the leveling indicator to confirm readiness; do not use the beam if the unit is flashing or out of range. |
| Step | Action | Site Requirement and Safety Check |
|---|---|---|
| 1 | Inspect the equipment | Check the housing, lens, tripod mount, battery compartment, labels, and controls. Remove damaged equipment from service. |
| 2 | Review the laser classification | Read the product label and instructions. Many construction laser levels are Class 2, but the actual classification must be verified on the specific unit. |
| 3 | Survey the work area | Identify eye-level paths, reflective materials, vehicle routes, moving machinery, edges, stairs, and people who may enter the beam path. |
| 4 | Position the level securely | Place it on a stable surface or lock it onto a tripod. Keep it clear of vibration, impact, water, dust, and unstable edges. |
| 5 | Aim and activate carefully | Point the beam toward the intended target only. Never stare into the aperture, use optical instruments to view the beam, or direct it at another person. |
| 6 | Confirm leveling status | Wait for the self-leveling indicator or leveling bubble. A warning signal usually means the unit is outside its compensation range or has been disturbed. |
| 7 | Take and verify measurements | Mark the reference line or point, then verify critical dimensions with a tape measure, spirit level, staff, or detector as appropriate. |
| 8 | Control the beam during breaks | Switch the laser off when it is not needed. Do not leave an active beam unattended in a public, occupied, or traffic-sensitive area. |
| 9 | Pack and maintain the unit | Clean the lens with an appropriate soft cloth, remove batteries for long-term storage when recommended, and store the instrument in its protective case. |
On a busy site, a laser level can turn a rough layout into a clear reference. Line, dot, and rotary models suit different tasks. Choose one that matches the room, distance, and visibility. Before switching it on, inspect the housing, tripod, batteries, and controls. A cracked window can distort the beam. I have learned that small setup errors create large alignment problems. Place the tool on firm ground, away from vibration, traffic, and standing water. Lock the tripod legs and check the leveling display. Work slowly.
Never aim the beam toward eyes, vehicles, aircraft, or reflective surfaces. Even a brief glance can cause discomfort or temporary vision problems. Keep bystanders informed, especially when the beam crosses a walkway. Use a receiver outdoors when sunlight weakens visibility. Do not stare into the beam or use optical equipment to view it. Read the safety label and manual before field use. If the level falls, stop working and inspect it before restarting. Do not assume it remains accurate.
Tips: Wear suitable eye protection when the task assessment requires it. Ordinary glasses may not block laser light. Mark reference points with pencil, not memory. Recheck measurements from a second position. Dust and heat matter. Wipe the lens with a clean, soft cloth. Store the level in its case after use. I sometimes rush the final check, and that is exactly when mistakes appear. A short pause can prevent rework, unsafe cuts, or misplaced fixtures.
Dot lasers transfer points across floors, walls, and ceilings. Line lasers project horizontal or vertical references. Cross-line models show both axes. Rotary lasers suit large outdoor layouts. Multi-plane lasers create several 360-degree lines indoors.
A line laser usually works well for cabinets, partitions, and tilework. A cross-line model helps align both height and direction. A rotary unit may be unnecessary in a small bathroom. Match the tool to the area.
Rotary lasers support long layouts for foundations, grading, and exterior framing. They can cover wide spaces more efficiently than short-range line models. Use a receiver when sunlight makes the beam difficult to see.
Place the tripod on solid, stable ground. Keep it away from vibration, traffic, and direct sunlight. Check the lens, housing, battery, and pendulum lock. Allow self-leveling to finish before marking anything.
Mark a reference point on a nearby wall. Rotate the tool 180 degrees and compare the readings. Repeat the test at different distances. A visible shift may indicate movement or calibration error. Check it twice.
Keep the beam below eye level whenever possible. Never stare into the aperture. Do not aim it at workers, drivers, aircraft, or reflective surfaces. Control access around active beam paths. Follow the equipment label and workplace procedures.
Yes. Dust can affect the lens, while vibration can move the tripod. Temperature changes may also influence accuracy. Reflective surfaces can distort readings. Recheck the line after moving the tool.
Inspect the housing, lens, and mounting points. Repeat a calibration test before using it for critical layout work. If verification fails, stop using the instrument. Follow the stated tolerance and qualified testing schedule.
A perfect-looking line can still come from a loose tripod or shifted setup. Mark the point with a pencil, then compare it manually. That extra minute can reveal an expensive mistake. Small errors matter.
Power it down before packing. Clean and protect the lens. Record impacts, unusual readings, and test results. Store the unit securely, away from moisture and heavy vibration. I still recheck after transport.
In 2026, laser levels remain valuable tools for improving accuracy and efficiency on construction sites. Different types, including line, cross-line, rotary, and point laser levels, are suited to tasks such as alignment, leveling, grading, framing, and layout. Choosing the right model depends on the project’s scale, working distance, required accuracy, visibility, and indoor or outdoor conditions. Proper setup is equally important: place the tool on a stable surface or secure tripod, check its working range, allow self-leveling to finish, and verify calibration before marking measurements.
Learning how to safely use a laser level on a construction site helps prevent inaccurate results and avoidable hazards. Operators should read the instructions, inspect the equipment, keep the beam away from people’s eyes, use suitable eye protection when necessary, and avoid directing the laser toward traffic or reflective surfaces. Regular checks, careful positioning, and safe storage will support reliable performance throughout the project.
